Robot Pick Calibration#
In this page we will see how to link vision coordinates with robot coordinates to enable precise picking of components.
What is Robot Pick? The Robot Pick function calculates the offset between the coordinates detected by FlexiVision One and the robot’s actual coordinates, allowing the robot to pick the components in the correct position.
Danger
Fundamental robot coordinates!
This phase MANDATORILY requires the X, Y, Rz coordinates saved during the physical preparation of the setup (Step 1 of the Clearances section).
Without these coordinates, the calibration cannot be completed. If they are lost or forgotten, it will be necessary to repeat the entire physical preparation with the robot.
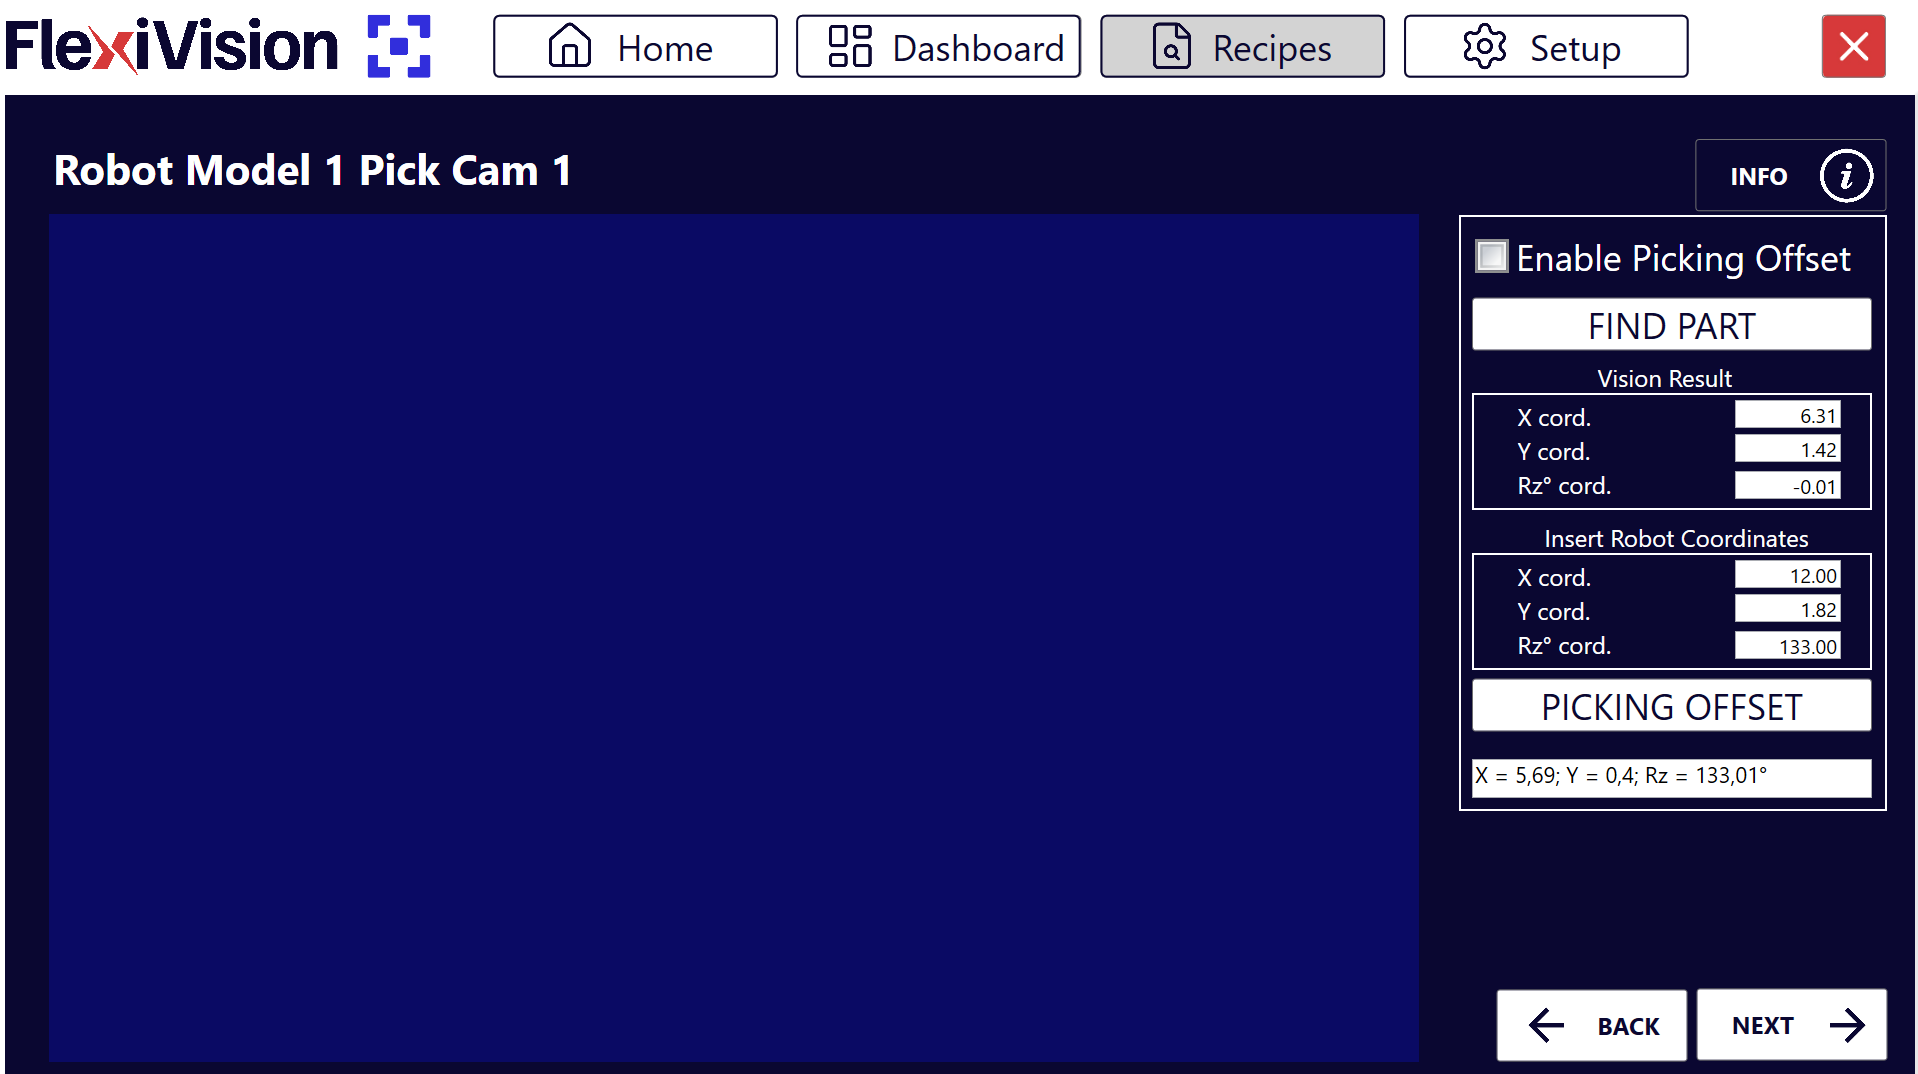
Robot Pick Interface Overview#
After clicking ‘Next’ on the Clearances page, the Robot Model Pick page opens.
Section |
Parameter |
Function |
|---|---|---|
Enable |
Enable Robot Pick |
Activates robot calibration |
Vision Result |
X cord |
X coordinate detected by vision |
Vision Result |
Y cord |
Y coordinate detected by vision |
Vision Result |
RZ cord |
Z rotation detected by vision |
Insert Robot Coordinate |
X cord |
Robot X coordinate (to be inserted) |
Insert Robot Coordinate |
Y cord |
Robot Y coordinate (to be inserted) |
Insert Robot Coordinate |
RZ cord |
Robot Z rotation (to be inserted) |
Function |
Description |
|---|---|
Find Object |
Detects the component and shows vision coordinates |
Picking Offset |
Calculates the offset for the correct picking |
Step 1: Component Activation and Detection#
1 |
Click Enable Robot Pick |
2 |
Click
Note Vision Result: These are the coordinates that FlexiVision One ‘sees’ in the image. They are not yet linked to the robot’s coordinate system. |
 :
:Tip
If you have any doubts during configuration, please consult the INFO key on the current page.
Step 2: Robot Coordinate Insertion and Offset calculation#
3 |
In the Insert Robot Coordinates box, enter the coordinates saved when creating the model:
Danger Use the coordinates saved during model setup. Without these coordinates, the calibration will be incorrect! The coordinates must be entered with the utmost precision:
Errors at this phase cause completely incorrect robot offsets, resulting in picking attempts in wrong positions (even tens of centimetres of error). Failure to comply with these two points could lead to robot collisions resulting in damage to the FlexiBowl®, components or the robot itself. |
4 |
Click
|

How Does the Gripper Offset Work?
The system compares:
Vision Coordinates: where FlexiVision One ‘sees’ the origin of the component
Robot Coordinates: where the robot actually grasped the component
It calculates the difference and stores it as an offset. This offset will be applied to all detected components in the future, ensuring that the robot always picks in the correct position.
Tip
If you have any doubts during configuration, please consult the INFO key on the current page.
Step 3: Finalising and Saving#
5 |
Click |
6 |
Click Complete Saving Saving includes:
|
 to go back to the recipe page
 to save the entire configuration
Multiple Models - Adding More Models#
Step 4: Additional Models (optional)#
7 |
To create other models in the same recipe:
Tip Each model in the recipe can have different configurations (ROI, clearance, offset), allowing you to manage components with different features in the same application. |

See also
For any issues with the steps just completed, refer to Troubleshooting