Creating Recipes and Models - Overview#
This section guides the user through the complete process of creating an application recipe and the part models required for robot identification and picking.
Note
Prerequisites
Before proceeding with the creation of recipes and models, make sure that:
All hardware setups are completed (Component Setup)
Camera calibration has been successful (Camera Calibration)
Robot calibration is completed
Physical parts to be identified are available
Recipe vs. Model: Fundamental differences#
Before starting, it is important to understand the difference between Recipe and Model:
What is a Recipe? |
What is a Model? |
|---|---|
The global container of the entire picking application. |
The specific definition of a single component to be identified. |
It includes up to 8 models, FlexiBowl®, Hopper parameters and communication logics. |
It includes training images, ROI, visual features, filters and robot offsets. |
It manages hardware parameters (vibration, speed) and network parameters (TCP/IP port, timeout). |
It manages vision parameters (threshold, minimum score) and picking coordinates (gripper). |
It can manage several types of parts simultaneously (multi-model). |
Focused on one specific visual pattern. |
Tip
A recipe can contain up to 8 different models, allowing the robot to identify and pick different types of parts from the same application without changing configuration.
Complete process overview#
The process of creating a complete and functioning recipe consists of several sequential steps:
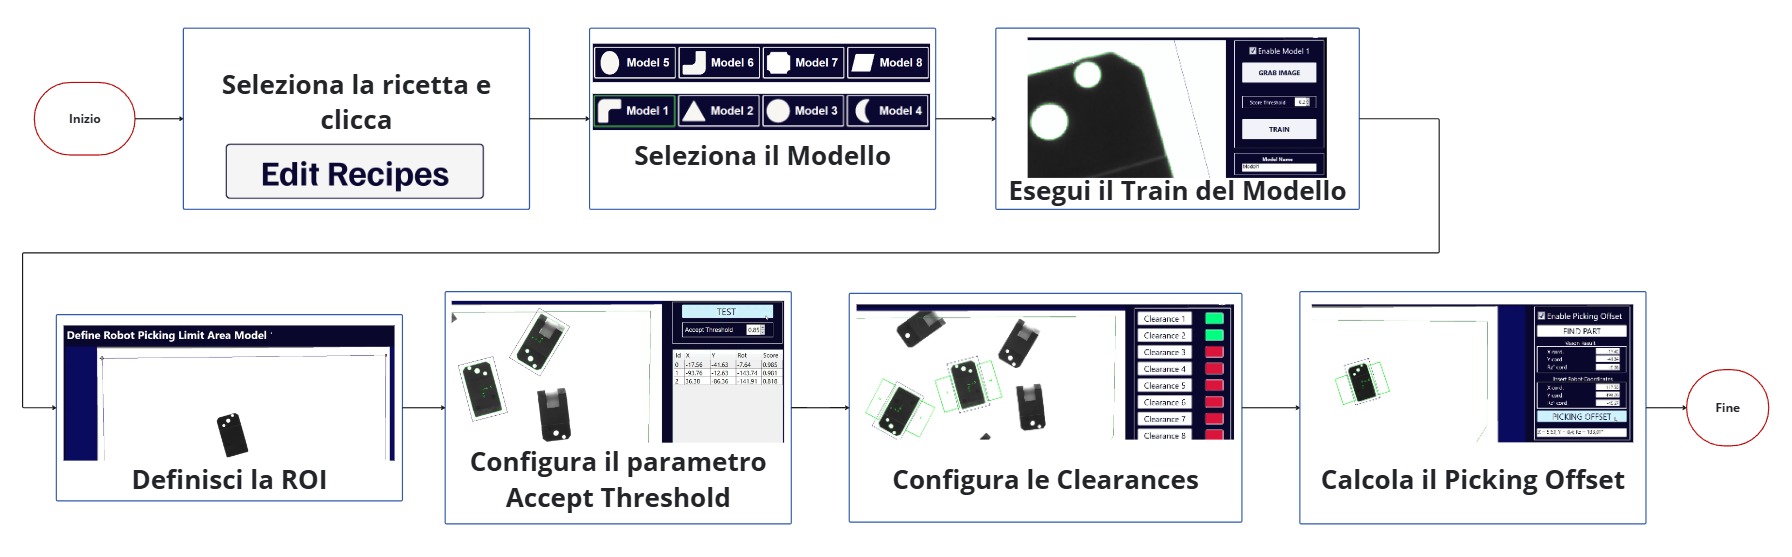
Complete outline of the recipe and model creation process#
Main Phases#
Phase |
Name |
Description |
|---|---|---|
1 |
Recipe creation |
Definition of application recipe with name, type and FlexiBowl® used |
2 |
Physical Preparation |
Positioning of the reference part in the vision area |
3 |
Pattern Training |
Image capture and creation of the identification pattern |
4 |
ROI Definition |
Definition of the search area where to search for parts |
5 |
Filter Setting |
Configuration of accept threshold and identification tolerances |
6 |
Physical preparation |
Picking simulation with robot to position the objects that will simulate the gripper footprint |
7 |
Saving coordinates |
Saving robot coordinates at the picking position of the reference component |
8 |
Creating clearances |
Defining areas that are to remain clear (gripper area obstacles) |
9 |
Robot coordinates |
Calculation of gripper offset for correct picking |
10 |
Testing and Validation |
Complete operating check and recipe saving |
Practical advice before starting#
Material preparation#
Tip
Preparation Checklist
Before starting to create models, you must prepare:
At least 10-20 parts to be identified (for testing purposes)
Clean parts in good condition (representative of production)
Gripper footprint simulators (must NOT be parts of the same type, as it is important not to get them mixed up with the reference part.)
Sheet for writing down robot coordinates (X, Y, RZ)
FlexiBowl® empty and clean
Backlight/Toplight switched on
Ideal environment#
Note
Ideal conditions for training
Stable lighting (avoid variable direct sunlight)
FlexiBowl® stationary
Robot in safe position (it must not interfere during captures)
FlexiVision One software open and basic recipe uploaded
Common mistakes to avoid#
Error
Avoid these common mistakes
❌ Do not save robot coordinates during physical preparation → impossible to calculate gripper offset
❌ Moving the part after saving the coordinates → wrong offset
❌ Feature threshold too low → model too detailed, identifies surface texture
❌ ROI too narrow → parts at the edges are not detected
❌ Clearances too small → gripper collisions with adjacent parts
❌ Do not test with multiple parts → problems not detected until production
Carefully follow the procedures detailed in the following sections to avoid these issues.
Support and additional resources#
Note
The INFO keys
In each of the operating sections, an INFO key is available at the top right.
This button has an explanation of the Step By Step procedure. The same procedure can be seen in the video tutorial.
Technical support: support@arsautomation.com for service
For specific problems when creating models, see Troubleshooting.
Next steps#
Once the overview of the process is understood, proceed with the actual creation:
→ Start: Creating a New Recipe